Creating a campaign in Invelo allows you to automatically market to property owners (Prospects) or buyers (Contacts) using direct mail, SMS, and email. Campaigns help you stay consistent with your outreach, automate follow-ups, and move records closer to becoming leads and deals.
Follow the steps below to create and launch a new campaign.
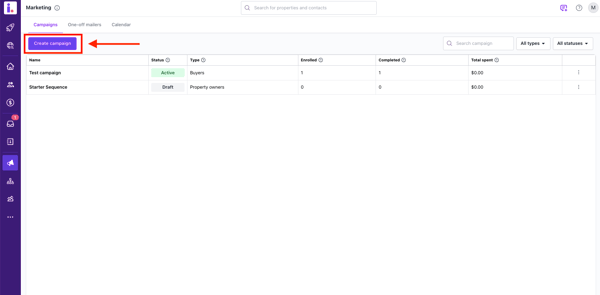
Step 1: Navigate to Marketing
-
From the left-hand menu, click Marketing.
-
Select Create Campaign.
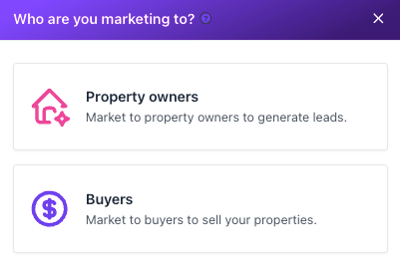
Step 2: Choose your campaign type
You’ll be prompted to select who you want to market to:
-
Prospect Marketing – Market to property owners in the Prospects stage.
-
Contacts (Buyers) – Market to buyers in your Contacts list.
Select the option that matches your marketing goal.
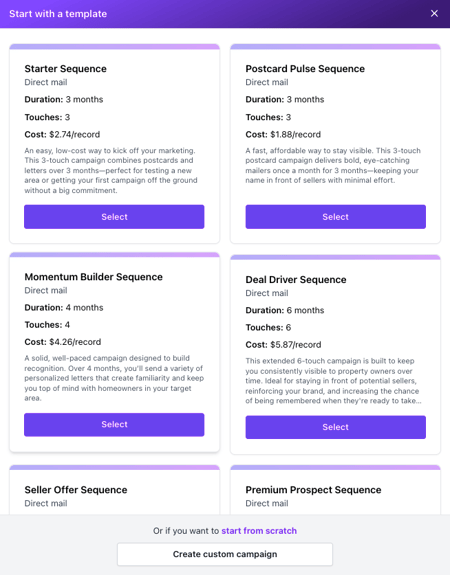
Step 3: Choose a template or create a custom campaign
You can:
-
Select a pre-built template from the list, or
-
Click Create Custom Campaign to build one from scratch.
Templates are great for getting started quickly, while custom campaigns give you full control over your messaging and timing.
Step 4: Name your campaign
Enter a clear and descriptive Campaign Name.
Tip: Include the audience type or strategy in the name (example: “Absentee Owners – Q2 Mail + SMS”).
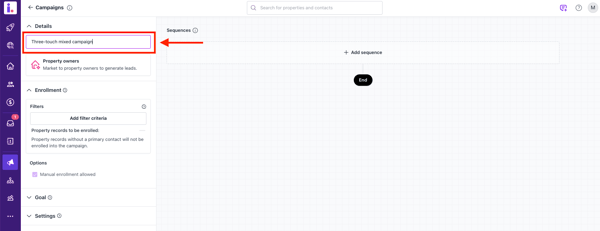
Step 5: Add your marketing audience
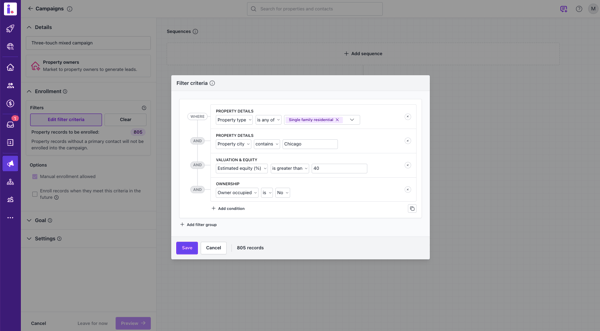
Use filters to define who should be enrolled in this campaign.
You can filter by criteria such as:
-
Property type
-
Location
-
Equity
-
Tags
-
Ownership details
-
And more
Your selected filters determine which records will be enrolled once the campaign is launched.
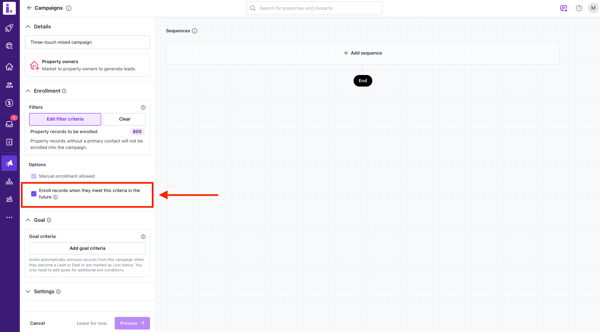
Step 6: Choose future enrollment settings
After setting your filters, decide whether you want to enable:
“Enroll records when they meet this criteria in the future.”
-
Enabled: Any new records that match your selected filters later will automatically enroll in the campaign.
-
Disabled: Only records that currently meet the filter criteria at the time of launch will be enrolled.
Enabling this option is ideal for ongoing marketing strategies where you want new matching records to continuously enter the campaign.
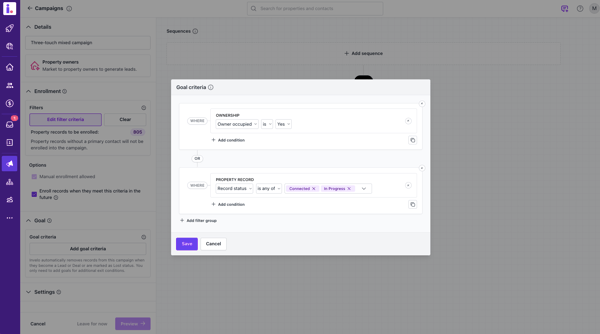
Step 7: Set your goal criteria
Invelo automatically removes records from a campaign when they:
-
Become a Lead
-
Become a Deal
-
Are marked with a Lost status
You only need to add Goal Criteria if you want additional exit conditions.
Examples:
-
Remove when a specific tag is added
-
Remove when a certain field changes
This ensures records stop receiving marketing when they meet your defined goal.
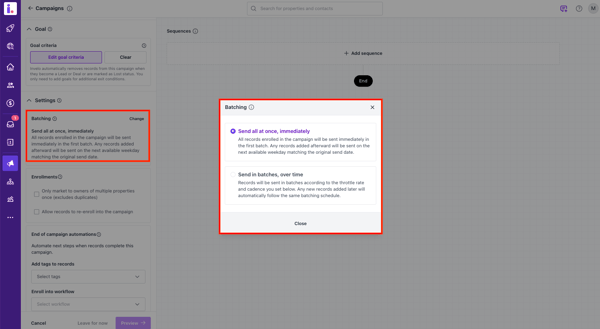
Step 8: Configure Campaign Settings
1. Batching
When launching a campaign, you can choose to:
-
Send to everyone at once
-
Divide your audience into smaller batches over time
Batching gives you more control over:
-
Delivery timing
-
Budget pacing
-
Performance tracking
This is especially helpful for larger audiences.
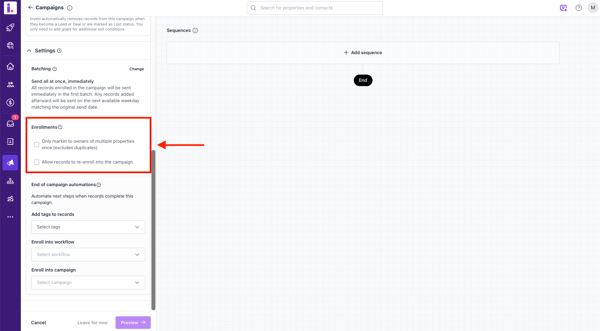
2. Enrollment Settings
You can control how records enroll in your campaign:
-
Deduplicate Owners of Multiple Properties
Choose whether to market to owners with multiple properties only once or allow each property record to receive marketing. -
Re-enrollment
Allow or disallow records to re-enroll after completing the campaign.
These settings help prevent duplicate outreach and maintain clean marketing logic.
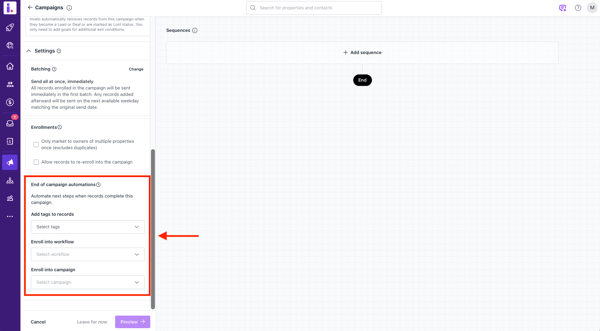
3. End-of-Campaign Automations
Automate next steps when records complete the campaign.
Available actions include:
-
Add tags to records
-
Enroll into a workflow
-
Enroll into another campaign
This allows you to seamlessly move prospects into your next follow-up strategy.
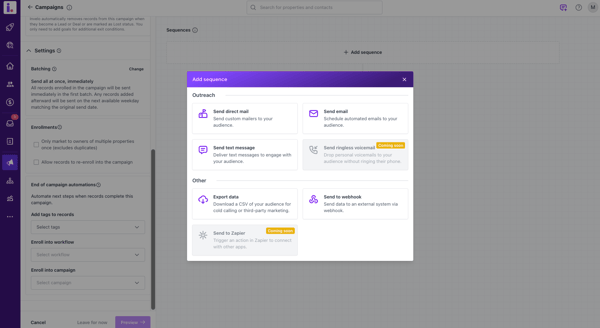
Step 9: Add your sequences
Build your campaign sequence using one or more marketing channels:
-
Direct Mail
-
SMS
-
Email
You can customize:
-
Message content
-
Timing between steps
-
Delivery type (for mail pieces)
Combine multiple channels to create a multi-touch marketing strategy.
Step 10: Review and launch
Before launching:
-
Confirm your audience filters
-
Review your goal criteria
-
Double-check batching and enrollment settings
-
Review your sequence timing and messaging
Once everything looks correct, launch your campaign.
You’re ready to market
After launching, Invelo will automatically enroll records based on your filters and campaign settings. From there, you can track performance, monitor responses, and manage conversions directly inside your CRM.
If you need help optimizing your campaign strategy, reach out to Support — we’re here to help you get the most out of your marketing.