When importing a file into Invelo, you can create new records or update existing ones — including stage changes, owner contact updates, custom field inputs, and more. A successful import depends on how accurately you map your fields during the process.
You may not always know if your file includes duplicate records that already exist in your database, but it’s important to understand the quality of the data you’re importing to ensure the best results.
Before You Begin
Before you start mapping, choose which import type is best suited for the data in your file.
Invelo currently supports two import types:
-
Properties
-
Contacts
Each import type has its own required fields for a successful upload. Learn more about these in our Import a CSV File article.
We also recommend reviewing our guide on Naming Fields When Importing Property Records to ensure your headers are formatted correctly.
Pro Tip: Clean up your CSV before importing — remove duplicates, fix extra spaces, and confirm consistent headers. This helps reduce import errors and speeds up mapping.
Mapping Fields in Invelo
Once you upload your file, Invelo automatically attempts to identify and match your column headers to existing Invelo fields.
-
✅ Mapped columns will appear in green with a check mark.
-
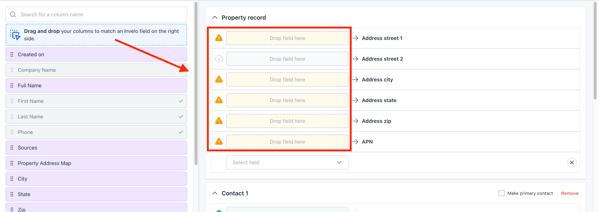
⚠️ Unmapped Required Fields will appear in yellow with a caution icon.
- You can manually map these by dragging and dropping your columns to match an Invelo field.
-
Unmapped columns will appear in white.
-
You may choose to skip this or manually map these by dragging and dropping your columns to match an Invelo field.
-
Pro Tip: If your file has a column likemobile_1, split it into two columns — one for the phone number and one for the phone type — so each maps to the correct Invelo field.
Custom Fields
If your file includes data that doesn’t fit any of Invelo’s existing fields, you can create a Custom Field directly from the mapping dropdown.
-
Click on "Add another field" and select “Create a new custom field.”


-
Once created, this field will be added to all of your records and available for future imports.
Note: Number of Custom Fields depend on your Subscription.
Manage Primary Values
You can also decide whether imported data should become your primary contact information (for name, mailing address, phone, or email).
This option appears on the far right of the mapping screen.
-
☑️ Checked: The imported data will become the primary contact or contact method.
Use this for niche lists like Probate, Inheritance, or Deceased owner data.
-
☐ Unchecked: The data will be added, but not made primary.

Pro Tip: Invelo automatically identifies and assigns the most up-to-date property owner and mailing address for valid property records.
Each record can only have one primary contact and one primary contact method for phone, email, and mailing address.
Mapping Terms and Definitions
| Term | Description |
|---|---|
| Required Fields | Fields necessary to create or update records in your database. |
| Mapped | A column that successfully matched to an Invelo field (green check). |
| Column Header | The name assigned to each column in your CSV file. |
| Invelo Field | The database field where your data will be stored. |
| Manage Existing Values | Lets you choose whether to overwrite data for existing records. |
| Make Primary | Marks the imported contact or info as the main record. |
| Primary Contact | The main contact assigned to receive communication and marketing. |
| Custom Fields | User-created data fields added to your records. |